Amazon Simple Storage Service (Amazon S3) is an object storage service that offers industry-leading scalability, data availability, security, and performance. This means customers of all sizes and industries can use it to store and protect any amount of data for a range of use cases, such as websites, mobile applications, backup and restore, archive, enterprise applications, IoT devices, and big data analytics. Amazon S3 provides easy-to-use management features so you can organize your data and configure finely-tuned access controls to meet your specific business, organizational, and compliance requirements. Amazon S3 is designed for 99.999999999% (11 9’s) of durability, and stores data for millions of applications for companies all around the world.
In this article, I will be deploying a React frontend application to AWS S3.
Prerequisites
An AWS account
Step 1: Creating a bucket on S3
Log in to the AWS console and from the services tab, select S3. You should have a page similar to the one below if you have not created an S3 bucket.
Next click on the create bucket button where we will fill the required details for the bucket. Provide any name of your choice. Kindly note bucket names are unique across AWS users, that means you can’t pick a name that is currently used by any S3 user.
Click on next and leave other settings as default and create the bucket. You will be taken back to the dashboard where the newly created bucket will be visible and accessible.
Step 2: Setup User Access
Now we need to set up a user that can access the S3 service from the command line/terminal which is where we will be running the commands to deploy our application.
We will do this using AWS Identity and Access Management (IAM) which is accessible from the services dropdown on the AWS console dashboard.
Your IAM dashboard should look similar to this;
From the left menu pane, select Users then Add user. Input the user name of your choice, check the programmatic access box. Programmatic access simply means the user can use his/her AWS access keys to connect to AWS services using AWS API, CLI (this article intend use case), SDK and other development tools.
Select next to move to the next configuration window where we will select the level of access this user will be given. We are assigning this user full access to S3 and to do that, click on Attach existing policies directly and search for S3 using the provided search box. We will be selecting the AmazonS3FullAccess from the displayed result.
We will leave all other settings as default and create the IAM user. You are required to download a generated credentials for this user then close.
Step 3: Configure AWS CLI & Setup Project
On Mac, you can use brew to install the AWS CLI by typing the following command;
On your terminal, run the following command to properly set up the AWS credentials on your local system.
This command will create a .aws folder on the local machine and store the credentials in it.
You will be prompted to input first, your access key ID then secret access key. These are the keys provided in the .csv file you downloaded in step 2. You can leave the default region and default output format blank.
To make sure everything is set up properly, you can run this command;
This should output the list of buckets you have on S3.
For this tutorial, I will be using the production build of create-react-app. The same settings apply to any React application. In the project (create-react-app) directory, first, create the production build by running;
Then add the command below to the scripts section in the package.json file, the script is what will be called to deploy the content of the build folder to the S3 bucket specified.
This command, using the AWS CLI syncs the build folder with the S3 bucket. Note; change the your-bucket-name in the command to your own bucket name.
Step 4: Configure bucket for web hosting
One of the cool features associated with using AWS S3 is the ability to set up your bucket as a static web hosting platform. In this step, we will need to do just that. Head over to the S3 dashboard and select your bucket.
Under the properties tab, select static web hosting and check the use this bucket to host a website box. Fill the index document and error document field as index.html, copy the endpoint on the form to your dashboard and click on save. Take note of the endpoint on the form as this will be the URL with which we access the application from the web browser.
Under the permissions tab, click on the bucket policy. We need to add a policy that allows access to the bucket and in turn the application. Add the policy below, make changes to the Resource by replacing the example-bucket with your bucket name and save.
We are good to go.
Head over to the project directory in the terminal, run the script using the command;
This will deploy the React application to AWS S3. Visit the application live using the endpoint.
Conclusion
Although, you can launch your web application on S3 using a serverless architecture (e.g AWS Lambda + API Gateway + DynamoDB) the AWS S3 web hosting feature primarily supports static websites.
How One Tech Meet-up Turned This Developer into a Public Speaker
Learn how a Django meet-up during university led Andela developer Faith Ng’etich to learn programming, build tech communities, and ultimately travel to San Francisco to speak at the Lesbians Who Tech Summit in San Francisco, the largest LGBTQ professional event in the world.
Meet Faith Ng’etich
Faith Ng’etich is a software developer, public speaker and community builder based in Nairobi, Kenya. In her two years at Andela, Faith has built an impressive resume. She is a coach with Rails Girls, former community lead of the Nairobi chapter of AnitaB, and member and advocate of Agile Ventures, an open source community. She’s delivered talks on crowdsourced learning and software development at the African Women in Tech conference. All of this, while working full-time with U.S.-based tech companies.
Pathway to Programming
Faith never anticipated becoming a software developer. During university, her interest was piqued by a course in a statistical programming language (R). She began attending coding meet-ups from there, and soon learned about Andela. She did not consider herself a developer, and questioned her ability to get into the highly competitive program. Despite her self-doubt, she began the extensive application and interview process in 2017, and got in on the first try.
Silicon Savannah to Silicon Valley
Fast forward a few years — this month, Faith will add to her list of accomplishments by speaking at the 2019 Lesbians Who Tech Summit. In her talk, Crowdsourced Learning in Distributed Teams, she will give insights into how she leveraged an expansive range of collaborative learning resources to build her career. She says, “I’ve always learned best in teams. In the open source community, individual contributions are critical, but working together to build skills has been a critical part of my career development.”
Speaking at LWT means a great deal to someone who has been involved in tech communities from many angles – coach and mentor, speaker and listener, teacher and learner. Faith says, “Inclusive communities are what brought me to my career and to Andela, so I want to help create that environment for others.”
Come learn more about Faith, her journey, and her experiences learning in a distributed team at 3:00 pm on Friday, March 1st. Connect with us on Twitter – @faith__ndetich or @andela or find us at the conference here. We can’t wait!
At Andela, we’ve developed a framework to assess talent. This framework has allowed us to select 1,100 developers from a pool of over 100,000 applicants. Beyond technical ability, our developers possess traits like learning velocity and grit, and team skills such as collaboration, and problem-solving. Looking for developers like this? Let us help!
If onboarding is something you leave to your HR team, think again. The first few weeks on the job determine how successful an engineer will be for the next few years, and the data backs it up: A lack of investment in onboarding among high-growth companies is in part why 25% of tech employees now leave within one year of joining. Whether your new hires are on-site or distributed, here are five tips for getting new engineers up to speed.
The Keys to Onboarding Successful Developers
Detailed communication and clear expectations are critical to onboarding for any team — but even more so when working distributed. “When we hire a new developer, we work not only to hone their hard skills in technology but also their soft skills that will help them work with the team,” says David Blair, Andela’s CTO.
Blair continues: “Our curriculum builds skills in how to communicate effectively, whether you are on Slack, email, or a call with the client. We go over difficult situations like how to raise objections if you don’t believe an estimate is right. And we make it clear that they aren’t expected just to be ticket takers. We emphasize they need to take the initiative and propose solutions to any problems.”
With more than 1,200 Andela developers in Nigeria, Kenya, Uganda, and Rwanda who currently work with hundreds of tech companies around the world, we’ve learned that effective communication is a clear indicator of developer and team performance, and that the first few weeks on the job have an outsized impact on long-term success. While we’re by no means perfect, it’s something we’re consistently working to improve — and it’s a big reason why Andela was recently voted the best place to work in Africa.
Blair offers several other insights he’s learned in his career:
Make new workers full members of the team right away.
That means putting them in the employee directory, ensuring they’re on the right email lists and Slack channels, and inviting them to the same meetings as other team members. Little things count, and it’s important to signal to newcomers and existing employees that all team members are treated the same wherever they happen work.
Explain how the company and the code work.
Of course, you should give newcomers access to your software documentation and employee handbook, but assigning reading is not enough. Schedule time over the first few weeks to introduce remote developers to the code base, your engineering workflow, the product roadmap and the way team members communicate.
Get them producing quickly.
See if new developers can commit code in the first week. It doesn’t have to be major, but even a minor accomplishment will mean a lot. Having new employees work on fixing bugs in different parts of a system is a fantastic way to introduce them to your architecture.
Immediately assign new developers to group projects.
“The best way to learn is from a peer, one-to-one,” Blair says. Having new developers work in pairs or on small project teams helps them pick up skills they need faster.
Provide early and ample guidance about the tools and methods of collaboration.
“We’ve got software engineers that come to Andela with computer science degrees who don’t know anything about how to code with others,” Blair explains. “They’ll say, ‘I always worked on my own code, on my own editor, with my own repo. Now for the first time I’m learning how to avoid conflicts by branching and merging code.’ It’s all about learning how to be part of a team.”
Bradley Scott, Andela’s VP of Technology Product, has years of experience managing product and engineering teams of all types, so he knows the do’s and don’ts of remote work firsthand. Here, he shares four ways to overcome common objections to distributed work and build strong engineering teams.
His first recommendation? If you want your developers to build rapport and communicate better, stop holding team meetings in a conference room. Instead, make everybody log onto a video meeting from their own desks. It may sound counterintuitive to build teamwork by keeping team members away from each other. But it makes sense when you realize that the most companies have at least a few distributed team members.
“If you are just a face on the TV and everyone else is sitting around the table, you are naturally going to feel at a disadvantage. You miss the side conversations and the jokes people are laughing at,” says Bradley Scott, VP Technology Products at Andela, which helps companies scale distributing engineering teams. “Our rule is that if one person is remote we’re all remote. Everyone will see each other’s faces looking at the camera and we can all start from the same baseline.”
With more than 1,000 developers across Africa working with 150 companies globally, Andela has developed a framework to foster the most productive distributed work culture. The key, Scott explains, is open, transparent communication that treats each team member equally. Here are more of his top tips to make this work:
Make sure everyone is in the loop.
“Think twice about walking over to someone’s desk and having a one-on-one conversation about a project that also involves people in other offices,” Scott says. “Instead, it may be better to start a Slack chat on the subject, so everyone gets the information at the same time.” Note that Scott is not suggesting that people in the home office stop speaking to each other. But if you do have a conversation about something at the water cooler, send a message about it to the rest of the team as soon as you get back to your desk.
Develop asynchronous work habits.
Avoid unproductive status updates and unfocused brainstorming sessions by thinking about ways to collaborate other than a team meeting. “Rather than having everyone sit in a meeting to go through a new project, we might share a Google Doc,” Scott says. “That way, people can read it, ask questions and make comments at the time that works for them. The next day, I can see all the feedback and answer all the questions. It’s all very transparent.” Along with catering to various working and learning styles, this also helps teams who may be distributed across multiple time zones.
Have frequent 1:1 video meetings with direct reports.
If you’re not working in the same office as a team member, it can be harder to notice if blockers are cropping up. “It’s essential to have regular, frequent, open one-on-one conversations,” Scott explains. “People will tell you their concerns, but you might have to ask more than once. It takes some nuance to create the environment where people feel safe being honest with you.” This may explain why distributed engineering managers are more than twice as likely to have weekly 1:1s with their team members than managers with no distributed team members, according to a survey of over 500 engineering managers in the U.S..
Bring everyone to the same place at least once a year.
A lot of work can get done by email, Slack, Google Docs and videoconferencing, but none of that is the same as being in the same place at the same time. “It’s hard and it’s expensive, but we firmly believe it’s worth it to bring the whole team together at least once a year,” Scott says. “You have impromptu conversations at the office, or you go out to dinner and learn interesting facts about the people who you work with.” These interactions build bonds that persist even after everyone goes home. “We have learned that it’s not hard to foster and grow relationships remotely,” Scott says. “But it’s much easier if you are building on a foundation that has been established face-to-face.”
This is a summary note/transcript for the technical workshop held in Andela Nairobi in February 2019.
OVERVIEW & PURPOSE
The technology we use today has become integral to our lives and increasingly we expect it to be always available and responsive to our unique needs, whether it is showing us when a service is almost failing or auto-playing a relevant song based on our play history. As software engineers, we are responsible for delivering this technology to meet these expectations and increasingly we rely on data (massive) to make that possible.
In this workshop, we explore the process of organizing the data we receive to allow for real-time analytics. We use the example use case of an organization needing to visualize the logs from the backend servers to a dashboard.
SCOPE
Transform raw data to processed data.
GCP.
OBJECTIVES
Explain what a data pipeline is.
Give an overview of the evolution of data pipelines.
Build a working example using GCP Dataflow and BigQuery
PREREQUISITES
Basic Python knowledge
OUTCOMES
Success looks like:
Data read from a plain text/CSV file loaded to an analytics DB.
Attendees able to run the code on their own.
DATA PIPELINE
A set of data processing elements connected in series where the output of one element is the input of the next one.
PROPERTIES:
Low event latency
Able to query recent events data within seconds of availability.
Scalability
Adapt to growing data as product use rises & ensure data is available for querying.
Interactive querying
Support both long-running batch queries and smaller interactive queries without delays.
Versioning
Ability to make changes to the pipeline and data definitions without downtime or data loss.
Monitoring
Generate alerts if data expected is not being received.
Testing
Able to test pipeline components while ensuring test events are not added to storage.
TYPES OF DATA
Raw data
Unprocessed data in format used on source e.g JSON
No schema applied
Processed data
Raw data with schema applied
Stored in event tables/destinations in pipelines
Cooked data
Processed data that has been summarized.
MOTIVATION FOR DATA PIPELINE
Why are you collecting and herding the data you have? Ask the end user what they want to ask or answer about the app or data. E.g how much traffic are we supporting, what is the peak period, location e.t.c.
PIPELINES EVOLUTION
Flat file era
Save logs on server.
Database era
Data staged in txt or CSV is loaded to the database.
Data lake era
Data staged in hadoop/S3 is loaded to the database.
Serverless era
Managed services are used for storage and querying.
GOTCHAS
Central point of failure
Bottlenecks due to too many events from one source.
Query performance degradation where a query takes hours to complete.
KEY CONCEPTS IN APACHE BEAM
Pipeline
Encapsulates the workflow of the entire data processing tasks from start to finish.
PCollection
Represents a distributed dataset that the beam pipeline operates on.
PTransform
Represents a data processing operation or a step in the pipeline.
ParDo
Beam transformation for generic parallel processing.
DoFn
Applies the logic to each element in the input PCollection and populates the elements of an output collection.
You are one of luckiest people at this time (circa 2019) because your job is one of the top jobs of this era. You are the cynosure of all eyes and perceived to be the shaper of the future, you have a made a good choice.
When I was getting started as a Software Developer, I almost got enlisted into the military, at the final stage, nepotism set in and I could not proceed. Some months later, I started my journey to Professional Software Development and thought to myself: “this is better, I will not be spending quality time away from family, I am guaranteed a longer life expectancy (as I will rather be deploying on different environments instead of being deployed to war zones)” .
So far, I have not been totally wrong, but there are things to be wary of. And some of these things are not actually discussed among developers. We need to talk about it because we love what we do and we want to do it for a long time or to a point we feel we have accomplished so much we want to move to a second career.
I will mention some of the things I think a lot of developers should pay attention to. It is possible to see someone who has been this profession for many years without any medical concern, but our bodies have a way of playing tricks on us. It typically tricks us into thinking that all is fine until it is too late.
The Comfort is the Enemy
Sitting is one of the easiest things to do, but it could easily become one of the greatest pointers of danger especially if you seat for so long without breaks. Some medical experts suggest an average of standing for every quarter in an hour that you spend sitting. This is because excessive sitting has been linked to everything from increased risk of obesity and depression to heart diseases, etc. The general rule to observe is:
“If you wait until you have pain before you change positions, it’s too late. This pain is hard to get rid of, so you have to be moving and changing positions before it starts.”
Your posture is as important as what you do.
The Eyes
Beyond sight, the eyes help us to judge depth, interpret new information and identify colors. The eyes are the most used part of the body, every part of your daily work revolve around what your eyes see.
You are not going to become blind using a computer, but you are exposed to Computer Vision Syndrome such as eyestrain, dry eyes, headache, fatigue, difficulty focusing, blurred vision, and shoulder and neck pain. Most of these symptoms go away after work but they can affect your productivity and wellbeing over a long period of time.
Ensure your eyes are comfortable with the font size that you choose. Smaller font size can make you susceptible to eyestrain. It will be a good investment to get anti-reflective glasses just for the sake of the time you spend in front of a screen. Take regular breaks, lubricate your eyes and blink often.
Lastly, you should be 20 to 28 inches away from your computer screen. The top of the screen should be just below your eye level and slightly tilted away from you at a 10° to 20° angle.
The Spine
It is not uncommon to have back pain after sitting for hours especially when not paying attention to your posture. Sometimes we end up slouching because we want to focus and pay more attention. DON’T! You should actually sit back and let your backrest on your seat at about 100 –110degrees while your feet are flat on the floor. Use a posture corrector, a lumbar pillow if necessary. Do cobra stretch regularly.
This is a common pose for developersErgonomics is not a tool but a process
The Wrist
It is possible to feel a strain on your wrist after spending long hours at your work station. Since ergonomics is not a tool but a process, you need to always pay attention to postures that work for you. I have resolved this by tilting my keyboard to about 20 degrees or more and this has been helpful, always find the point that is convenient for you.
Learn Touch Typing
Touch typing is the ability to use muscle memory to find keys fast, without using the sense of sight, and with all the available fingers, just like piano players do.
While you do not need this to be a successful developer. Touch typing is will improve your productivity and help your health a great deal as you do not need to repetitively look at all your keyboard all the time. The benefit of this will be appreciated in the long term.
Get A Fitness Plan
Do not let the work you love be the all about you. And do not see the idea of having a fitness plan to be something strange. It does not have to be a gym membership, it could be as simple as having a goal for move minutes daily. Use apps like Google Fit to track your fitness goals. Be committed to your plan.
Eat healthily and sleep well, understand what best works for you, are you a night owl or an early bed. Good Sleep solves a lot of health problems.
Be Social
While this piece is not for everyone, we should all try to find something else we are passionate about aside coding. It could be Swimming, Public speaking, arts, politics, photography, volunteerism etc. Find people of like minds.
Get a real life, find people that care about you and you truly care about. Share your problems, get help whenever you need it.
It is also not uncommon to see that developers do not take time off except when we can’t do without it, we should take time off and respect it by doing away with our work tool. If you have health insurance, use it at least just for a general checkup.
Conclusion
No doubt, our brains are always exercised but our bodies need at least half of what we do to our brains. According to Buddha, “To keep the body in good health is a duty, otherwise, we shall not be able to keep our mind strong and clear”.
RELATED: Check out our video on what programmer burnout is and how to deal with it:
Collaboration and project management tools are things that almost all managers rely on when running a distributed team, according to a survey of 500+ engineering leaders. But too often, these systems track the progress of projects without paying attention to the human beings working on them. People are more motivated and more satisfied when they’re connected to their coworkers. Psychological safety matters more to a team’s output than the individual skill of its members, according to Google’s Project Aristotle. “Things run more smoothly when I have a personal relationship with people I’m working with,” says Bradley Scott, VP of Technology Products at Andela, which has built distributed engineering teams for more than 150 global technology companies. “There’s more connective tissue and shared accountability. And it’s a lot more fun.”
Andela has been rigorous in measuring the factors that drive successful distributed teams. Interpersonal relationships, the company has found, drive team cohesion, which leads to increased productivity and lower turnover. Here are four concrete steps to develop these relationships:
Small talk is big.
Find as many ways as possible for people in all locations to share bits of their lives. It’s not a time waster to use a few minutes at the beginning of a video call to check in with people about what’s going out outside of work. Some teams at Andela have built Friday rituals where they post their weekend plans to a Slack chat in the form of emojis. “It always generates a conversation where you learn one or two things about someone you didn’t know before,” Scott says.
Celebrate and play together.
You can’t all be in the same bar at the same time, but there are creative ways to spread the good feeling around the world. Engagement party? Open up Facetime or Zoom so everybody can hear the toasts and make their own. Finish a new release? Order pizza for every office around the world. Holiday celebration? Try a global ugly sweater contest.
Encourage everyone to be seen in video calls.
Some distributed team members may be hesitant about turning on their video cameras, with excuses like, “It’s too early,” or “My office is messy.” Remind people that it’s not only okay, but highly encouraged to turn on the video wherever you are. “When I work from home, people see my guitar behind me,” Smith says. “That gets people talking about what music they like and helps develop relationships that go beyond day-to-day work.”
Lead by example.
Continue to reinforce the message that team members are treated equally regardless of location and circumstance. At Andela, formal evaluations between partners and developers include feedback on human factors, such as whether an employee blocked the camera during video calls, or a distributed developer felt like they regularly had all of the information they needed to do their work. “Leadership is discipline, education and empathy,” Smith says. “We have to constantly remind each other how much it sucks to be a thousand miles away and feel like you are shut out from all the fun.” Making small tweaks in the mindset of both distributed and co-located engineers can make all the difference in operating as a fully productive, distributed team.
Andela has made a commitment to increasing female tech talent since day one. “It has been a personal and a company-wide priority to recruit and retain top female talent since we began. We’ve conducted all-female recruitment cycles and classes in Lagos, Nigeria and are now starting a similar initiative in Kenya,” said Andela co-founder Christina Sass in an interview with CNN in 2016.
Because of these efforts, the Andela community is made up of women like Purity Burir, who launched the AnitaB community in Nairobi and Rehema Wachira, who transitioned from an advertising career into a full-time developer with Women Who Code. They are changing the narrative by being extraordinary developers that anyone would want on their team – regardless of gender.
Watch the video to learn how we can all set the standard for how the industry thinks about female tech talent, and drive towards #BalanceForBetter in tech.
If you ask engineering leaders to tell you the most challenging part of their role, most of them will say management. And these days — with companies building teams spread around the world and local developers working from home — engineering managers find organizing, managing, and nurturing a global herd of computer-programming cats even more challenging. “Managing distributed teams comes down to transparency, consistency and empathy,” says Bradley Scott, VP of Tech Products at Andela, which builds distributed engineering teams for global technology companies. “If there’s one rule, it’s to get everyone to collaborate in plain sight.”
Andela has created a management framework and technological tools to foster, measure and reward a unified culture of cooperation. Here are four of their top insights:
Be transparent
As a team leader, you can model how open and equal communication works. Make sure that any messages you send or information you keep is available to everyone in the same way at the same time. Track projects using Trello or another online equivalent. If team members at HQ get into a discussion and start whiteboarding on the conference room wall—and they will—coach them to send a photo right away to the rest of the team in a way that invites participation from everybody.
Measure and reward collaboration
You measure code quality and commits, so do the same for the other factors that contribute to team effectiveness. Do they communicate in a clear and timely way? Are they open and professional with the rest of the team? Andela measures a host of what some call soft skills, analyzing everything from whether developers are “speaking to be understood” down to how often they turn off their cameras while on video conferences—a move that often symbolizes disengagement. One note: Make sure to regularly explain what you are measuring and why it’s important. Surprising someone with this kind of data in a performance review never goes well.
Spread information to maximize developer growth and opportunity
In a survey of 500+ engineering managers, the majority said attracting and retaining developers is their biggest technical challenge. The best way to combat this is to create an environment where developers can grow, no matter where they live. In co-located teams, serendipity often plays a big role. For example, a team lead invites a developer to join a new project because they remember that person talking about a particular technology in the break room. With a distributed team, you have to be more intentional. Make sure that there are both formal and informal ways for everyone to share what they are working on. At Andela, managers can review a database of profiles of all the developers worldwide to find those that have the right skills for any new effort.
Prove that distributed is working
A lot of CEOs are not comfortable with distributed teams, fearing that if they can’t see the work being done, it’s not happening. You can combat this by creating transparency with the systems your team uses to coordinate and track its projects. This provides an excellent window through which senior leaders can see what developers are really doing. They can watch work flowing around the globe through chat systems, shared documents and other collaboration tools. Most importantly, they can see the hard numbers on how much code is being committed, where it’s coming from and how much it costs.
Earlier this year, in January, Andela announced our $100m Series D round. This was yet another symbolic validation of building a business with a purpose. Over the last four years, we have created an on-ramp to the global technology ecosystem for close to 1,200 African engineers, delivered excellent engineering services to hundreds of partner companies, and in the process, proven that brilliance is evenly distributed.
One of Andela’s core values is lifelong learning: Only by learning and iterating do we get to achieve our mission. One thing we’ve learned over the course of building Andela is that the global technology market is constantly changing. In order to best prepare African technologists to thrive in this market, we need to adapt and change with it.
This year, Andela will welcome 40% more aspiring developers than we did during all of last year. Andela Nigeria will reach 500 developers this month, Andela Kenya is well over 400 developers, Uganda is nearing 200 developers, and Andela Kigali welcomed our first two cohorts this year.
Now, as we prepare for the next phase of Andela’s growth, we are investing heavily in our talent development, learning technology, and developer growth programs. During this time, for the rest of 2019, we will be pausing Fellowship applications in Uganda and Kenya.
For aspiring technologists in Kenya and Uganda who are still committed to joining the Andela Fellowship this year, applications are still open every month for Andela Kigali, our pan-African hub. We also offer free online resources for anyone looking to level up their skills, and encourage all learners to join the Andela Learning Community: a network of technologists across Africa dedicated to solving humanity’s problems with code.
To all of our learners and the community at large: Thank you for your contributions to Andela’s story. We are excited to continue supporting thousands of African technologists on their journey to becoming world-class engineers.
Emotional intelligence is currently the most in-demand soft skill, especially in technology. Top companies have realized that employees with high emotional intelligence are able to thrive in the workplace because they possess excellent people skills and an ability to analyze and control situations effectively. Daniel Goleman, in his book titled “Emotional Intelligence: Why It Can Matter More Than IQ,” indicated that EI accounted for 67% of the abilities deemed necessary for superior performance in leaders, and mattered twice as much as technical expertise or IQ(Intelligence Quotient).
What is Emotional Intelligence?
Emotional intelligence is the ability to recognize, understand and manage your emotions and that of others. It’s not enough to be aware of your emotions, you also need to realize how your emotions affect people around you. When you understand how people feel and what forms the basis of their decisions and actions you begin to manage relationships and influence people more effectively.
Elements of Emotional Intelligence
Daniel Goleman, an American psychologist, developed a framework of five elements that define emotional intelligence:
Self-Awareness: The ability to know one’s emotions, strengths, weaknesses, drives, values, and goals and recognize their impact on others while using gut feelings to guide decisions.
Self-Regulation: This involves controlling or redirecting one’s disruptive emotions and impulses and adapting to changing circumstances.
Motivation: This is utilizing emotional factors to achieve goals, enjoying the learning process and persevering in the face of obstacles.
Empathy: This involves considering other people’s feelings especially when making decisions.
Social Skills: managing relationships to move people in the desired direction.
How to increase your Emotional Intelligence
Emotional intelligence can come naturally for some people and can also be an uphill task for others. The good news is that it can be learned and developed, just like any other skill. You can learn and improve your emotional intelligence using these strategies:
Be genuinely interested in people: The foundation of emotional intelligence is empathy and genuine interest in people. Always try to see things from the perspectives of others, and understand what forms the basis of their actions and decisions. Try to observe closely to discover what triggers the emotions of the people around you, especially in the workplace. A proof of genuine interest in people is when you listen to people so attentively that you hear both the said and unsaid things.
Let others shine too: This is for people working in a team and can’t seem to resist the urge to have the spotlight on them at the expense of others. When you attract all the spotlight and glory at the expense of your teammates, you begin to attract internal enemies, unbeknownst to you. You deserve praise for your good work and, by all means, enjoy your praise, but know when to step back and help propel others forward. That way you build lasting relationships even in the workplace.
Value Feedback: Always see feedback as what it is: “Feedback,” and not an attack on your person. If you will succeed in the workplace, then you must value feedback. Your colleagues, friends, and subordinates need to feel comfortable giving you honest feedback, even when it’s unpleasant.
Be Self-Aware: Be honest with your self. A simple SWOT (strengths, weaknesses, opportunities, and threats) analysis will do you much good in the workplace. Look inward to know situations that trigger your bad emotions and avoid them. If you have grown some muscle in EI, you can try to get into such situations and consciously try to respond differently. The reason for the SWOT analysis is to explore your strengths, work on your weaknesses, consider your opportunities and threats. If you don’t understand yourself and how to control your emotions how can you manage that of others?
Give genuine compliments: Your genuine interest in your colleagues will make you intuitively garner knowledge on how best to compliment them when it is appropriate to do so. Every human being loves compliments, and when they perceive sincerity in the praises (i.e, not flattery), they’ll appreciate you even more.
Keep an objective mind: Always expect that people won’t agree with your opinions every time because of diverse academic, financial and religious backgrounds. When you discover people’s perception of things, respect their opinions, even if you disagree with them. You could try, with logic and empathy, to win them over. It is really difficult to argue in the face of superior logic, and truth always wins. If you make a superior argument, they are more likely to be won over. Although, in as much as we want to win people over with love, if someone prefers a belief system that is inefficient and destroys relationships do not make excuses for them. Also, don’t let what you know to stop you from learning and unlearning.
Finally, Always pay attention to details, people’s reactions, mood, preferences, and beliefs. Bear in mind that you cannot be right always and don’t hesitate to apologize when you’re wrong or have offended someone. I hope this helps your relationships a great deal and set you up for success in the workplace.
Editor’s note: This is the first part of the series submitted by Benny Ogidan, one of the winners of the Andela Life Hacks Competition for March 2019. Ben is a software developer at Andela.
Background
It is super important to note that this post is not to convince you to start rewriting all your projects in GraphQL or to launch a Trump-style campaign that GraphQL is better than REST API. One of the many misconceptions around GraphQL especially when I started learning, was that if you wanted to implement GraphQL, you would have to re-write your entire backend. What this article aims to do is inform any readers on the benefits of using GraphQL and seeing it being introduced into a simple project.
So just for context purposes, it is probably nice to clarify that GraphQL was created in 2012 by Facebook. It was apparently developed as an alternative to the existing REST standard for structuring server queries. The spec can be traced to as far back as 2012. Initially, the problems facebook experienced were due to constant over-fetching of resources on their native mobile applications, performance got poorer as application logic got more complex due to the limited storage sizes of mobiles. GraphQL overcomes this problem allows the developer to specify the data that is returned. Facebook realized that data fetched continually changes inorganically, and there is a cost we ensure to maintain a separate endpoint with the exact amount of data for each component we make. And sometimes, we have to make a compromise between having loads of endpoints and having the endpoint which fit best with our applications.
GraphQL, according to Facebook, is a query language designed to build client applications by providing an intuitive and flexible syntax and system for describing their data requirements and interactions. GraphQL helps solve some of the problems attributed to REST API by using a Schema-Type system to allow developers to fetch only the data they require from an endpoint. One of the advantages of GraphQL is that you can use in conjunction with existing REST architecture, so that’s good news for folks who do not have to tear down their existing application to accommodate GraphQL.
All the code can be found here. PRs are welcome too.
Introduction
For more in-depth background information about GraphQL, I have added a few links at the end of the article. For this article, I have chosen to use the Apollo server for the backend implementation. This is the point some people will start asking why they keep hearing references to the Greek God of the sun . (It is also the colloquial name for a rather serious eye infection – and it is at this point I just realized why my parents have been giving me funny looks after they learned I work with ‘Apollo.’) So “Apollo Server, is a server-side JavaScript GraphQL implementation for defining a schema and a set of resolvers that implement each part of that *schema”. We will go into details of what schemas and resolvers are but for a more high-level explanation basically, Apollo Server is just an implementation of the GraphQL javascript spec with a bunch of libraries that help make coding a whole lot easier. Apollo Server integrates easily with various Node.js HTTP frameworks like Express, Connect, KOA, Hapi, etc. But that’s for another post
At this point, I do have to mention that as a developer that does not work for Apollo there are other implementations out there, some you might even find easier depending on individual use cases. For JavaScript, I do know and have tried GraphQL, Yoga built by Prisma, which is excellent. I also know they just introduced middlewares for their resolvers, which also works with Apollo, so it is excellent that both companies teamed up together so that tools work across the board. Also, if you, like me, like to understand every dependency going into a project, then you are welcome to go and grab the spec found here. As you can see it is available in a lot of languages, but for this post, I will be sticking to JavaScript.
GraphQL Mode of Operation
Schemas
So GraphQL uses only one endpoint at a time to fetch data. This endpoint can contain as little or as much data as we desire to depend on the logic. The way GraphQL works is based on its schemas which are strongly typed. This means in making your definitions in the schema on the shape of data specified, which essentially is the types of each property of the values returned.
The schemas have to be explicit due to the flexibility of the one route which is used to send and receive data. If something is specified in the schema but not returned, the response will contain a null for that field. However, if a specific field is not specified but is needed, the client won’t receive it until the schema is updated to include that field.
Queries and Mutations
Schema Definition Language (SDL) is one of the ways we write we can create GraphQL syntax. Queries and mutations are composed of the required fields we need to retrieve from the database in case of queries and for mutations the values we will need to manipulate.
Queries correspond to GET requests in REST API, they consist of logic which indicates the shape the data returned, should be in. This gives the user the ability to explicitly control the shape of the data to be used.
Mutations, unlike the Queries, correspond to the HTTP verbs that deal with changing of the data PUT, POST, PATCH and other HTTP verbs used to make changes to the data stored on the server.
All CRUD operations are handled by queries and mutation with queries reading the data and mutations manipulating it.
On our implementation, GraphQL will act as a layer on top of the ORM which in turn is a layer on top of the database help.
Setting Up
So first we need to set up an express framework server with a dotenv package to help hide any env variables we utilize in this post. I also have added inbabel as it helps to transpile down to ES5. The app we will be building is a simple application to enter students into a database with hobbies.
mkdir student-list
cd student-list
yarn init -y
you can use npm init -y, the debate on the why can be in the comment section
So we just added a ton of stuff I will go through the highlights of what they do.
Babel — helps us program with up to date ES6 spec
Sequelize — Sequelize is a promise-based Node.js ORM for Postgres and other databases. It is what will help us set up and connect to the database. Some people do not like ORMs because of the unnecessary overhead and complexity they may bring along with their queries. However, I feel they do a better job of acting like an abstraction for database logic allowing me to switch out from one database to another which is a trend with modern day applications where requirements can change very quickly.
pg- short for Postgres, since we are going to be using a field with array type support I decided to pick Postgres
apollo-server-express — This is the Express and Connect integration of GraphQL Server
sqlite3- I am a fan of using this in memory server for testing.
I am using the gql helper library to help with the GraphQL syntax. The gql library reads the Graphql syntax in using tagged template literals which allows for interpolation.
Go to this link and the page below should be rendered by Graphcool. Graphcool is an “in-browser IDE for exploring GraphQL” built by Prisma. It’s like an in-app implementation of Postman for GraphQL and it is a big help when testing out queries and mutation very quickly. You can test the query we listed and see what it resolves to.
Graphcool implementation of our application
So the GraphQL server is up, now for sequelize, to achieve this we need a bit more code. For tutorial purposes, I am going to be using sequeliz-cli
npm install -g sequelize-cli
This helps this gives us the ability to scaffold our project, we can use
node_modules/.bin/sequelize init
This helps us create migrations, models, seeders and config folders. To make creating a model we can use. This can be overwritten later with --f flag.
We are going to define relationships between both models as we want each student to be attributed to a hobby. However, in Part 2 of this post, we will be implementing an array thereby also changing the relationship.
We need to update the migration on the Hobbies model so we can have a reference for the Student model when a lookup is done to match the associated hobbies. I have included a studentIdcolumn to the Hobbiesmodel. So, we want a one-to-many relationship between our models i.e. One Student can have many Hobbies.
StudentId: {
 type: Sequelize.INTEGER,
 allowNull: false,
 references: {
 model: 'Student', // name of Target model
 key: 'id', // key in Target model that we're referencing
 },
},
Note: This was something I discovered later, defining this kind of relationship automatically capitalized the foreign key which is why I have capitalized it in the model above. This is the article that helped me understand this
You can now migrate, this process helps you prepare the models and associations ready for data retrieval and manipulation. It is essential you edit the config.json file with values that exist as it will fail. I have edited mine as you can see below. Also, I have set up an elephantSql account and I am using a Postgres instance which is the reason I am using a url parameter.
The models/index.jswill automatically look for the variables passed into the config.json. However, since what I have done is essentially a hack, by using an external Postgres service (Elephant SQL) for development I will have to edit the generatedmodels/index.js file in kind.
// models/index.js
if (config.use_env_variable) {
 sequelize = new Sequelize(process.env[config.use_env_variable],  config);
} else {
 sequelize = new Sequelize(config.url);
}
We can now refactor our server-side code to implement our newly created models.
Firstly, we need to open a new file called schema.js to implement out GraphQL logic
So I know that looks like a lot but trust me it isn’t. We are interpolating the GraphQL syntax with the gql package. Then we define the schema to mirror our database schema, we define types for Student and Hobbies which corresponds to our already defined models. On the Student type, we have defined an extra field called Hobbies which we use to retrieve a current student’s hobbies. Same for the Hobbies type which returns the corresponding student. These will be dealt with in the resolver. Notice how we have only both types share the Query and Mutation, this is because only one Query and Mutation type can be defined. However, there are ways these can be extended but we won’t go into those details until part 2.
Next, we defined three queries; one for fetching a single student, the other for returning all students and the last one getting a single hobby. You can add some for getAllHobbies as well if you are feeling brave. The mutation for createStudent and createHobbies should be pretty self-explanatory.
The bang operator! specified in the Query means I would like the return the whole type specified. e.g. Student! means return a Student type. If the type is not available then return null.
Resolvers
This is where the logic of our application goes, the resolvers handle data logic and how our data is returned. This is akin to the controllers in the MVC pattern but with less validation.
async createHobbies (root, { studentId, title }, { models }) {
  return models.Hobbies.create({ studentId, title })
   }
  },
}
The resolvers have four parameters (root, args, context, info). root or parent contains the actual data, args the arguments passed in the query.
According to the Apollo documentation:
root:The root contains the result returned from the resolver on the parent field, or, in the case of a top-level Query field, the rootValuepassed from the server configuration. This argument enables the nested nature of GraphQL queries.
args:An object with the arguments passed into the field in the query. These are normally passed from the client.
context:This is an object shared by all resolvers in a particular query, and is used to contain per-request state, including authentication information, dataloader instances, and anything else that should be taken into account when resolving the query. Here is how I make the models available for my resolver object.
info: This argument should only be used in advanced cases, but it contains information about the execution state of the query, including the field name, path to the field from the root, and more
We also need to resolve our student field in Hobbies type and hobbies in Students. These fields need to be resolved by the resolved as they are only present as ids on each table.
app.listen({ port: 4000 }, () => console.log(` Server ready at http://localhost:4000${server.graphqlPath}`)
);
As you can see. I have now imported the resolvers and typeDefs where there are taken in as arguments for our instance of the Apollo Server. The models are imported and made available via context in all the resolvers. I have also added sequelize.sync and sequelize.authenticate which syncs all available models and tests the connection to the database respectively.
We can also define a start script
"start": "node server.js"
New screen with the updated queries and Mutations
To test our mutations
mutation{
  createStudent(firstName:"Benny", email:"benny.ogidan@benny.com"){
    id
    firstName
    email
  }
}
Thanks for staying till the end I hope I have been able to enrich your minds. In part 2 of this post, I will be refactoring a lot of the code but will attempt to add on more complicated functionality. Like adding validations and stopping deeply nested queries.
Today, we’re excited to announce the launch of Andela Learning Community 4.0 in partnership with Google and Pluralsight. The program will run for a period of 6 months starting from today 15th May 2019.
Google and Pluralsight are companies that share our commitment to scale technology talent and learning across Africa, and we’re happy to partner with them. ALC 4.0 will bring Andela closer to achieving its bold mission of training 100,000 software engineers across Africa in 10 years.
The Andela Learning Community is open to everyone interested in acquiring technical skills, regardless of their educational background. For this current track, participants will be advancing their skills in Web development, Android development and Google Cloud technologies on Pluralsight. Learners who successfully complete the program have the opportunity to go a step further to take a Google Certification exam, thereby certifying their competence and job readiness. All interested applicants can apply here.
Since its inception, in partnership with companies like Google and Udacity, the ALC has delivered learning to over 33,000 developers and produced over 12,000 graduates across 17+ countries in Africa. In collaboration with Grow with Google and Pluralsight, we will deliver training to 30,000 more learners across 15+ countries in Africa with the ALC 4.0.
We have put out a call for collaboration across multiple media channels for volunteer ALC ambassadors and mentors who are interested in supporting new learners, to join us in raising the next generation of technology leaders. Sign up here to volunteer, if this looks like what you’re interested in.
Look out for more communications from us regarding everything pertaining to this program.
Authentication is hard. Let Google Handle it for you.
Handling user data is probably one of the hardest parts to get right of any application (web or not). There are just so many places for something to go wrong that it becomes really hard to ensure that your app is really secure.
Even big companies can fall prey to an insecure authentication system leading to awkward things like data breaches which in turn leads to other nasty stuff like lawsuits which I’m pretty sure you’d like to avoid.
This is why it is essential that you follow the latest best practices when designing an authentication system for your web application. Better yet, you could get someone more experienced to do it for you while you focus on the core features of your app.
Enter Google’s Firebase. Firebase, in this case, is the “someone more experienced” who will handle our authentication for us.
With Firebase, you can leverage the experience of some of the smartest minds in software development to build an authentication system that has been battle tested for years and vetted by the pros in the industry.
Firebase is actually a suite of solutions for common problems developers face when building mobile apps but for the purposes of this article, we will focus on authentication alone.
What you need to follow along
A Google Firebase account
A local development setup
Basic knowledge of React and React Router
A bucket of coffee because why not?
WARNING: We will be using a tiny amount of React Hooks in this article so you should brush up your Hooks skills here and here.
To get a Firebase account, visit firebase.google.com and click on “Get Started”. Note that you have to be logged in to your Google account for this.
If everything goes well, you’ll be redirected to a console. This is where you can create new projects, and manage existing ones so let’s create a new project. Once you log in to the Firebase console, you will see a big blue button with the text “Add project”. That’s the one you want to click on.
Click on it and complete the form that pops up. Give your project an easily identifiable name and continue. I’ll call mine “Gasoline” and no you can’t ask why.
Once you complete and submit the form, you get redirected to the project view. This is where you can add apps to this project (in my case, “Gasoline”). You have the option to add different kinds of apps but for this tutorial, we will go with a web app.
Click the specified icon
On clicking on the web app option, you get a bunch of code that you’re supposed to add to your web app. This is just a link to the Firebase CDN and a config object for Firebase. It looks something like this:
copy the config object
You want to copy the config object and keep it somewhere easily accessible because we’ll be needing it very soon.
One more thing to sort out before we get started. We want to enable authentication using email and password in our Firebase console.
On the left sidebar of the project overview page, click on “Develop” and you should see some options appear. Click on “Authentication” and you should see this page:
click “sign-in method”
Click on “Sign-in method” and you should see a bunch of methods you could use to authenticate your users. We’ll start small and just enable “Email/Password” for now.
Okay! Let’s get started!
What we will build
To get you comfortable with the basics of Firebase, we’ll build a simple React.js app without any extra bells and whistles to distract you.
Our app will be a simple web app with a home page, two forms for signup and login, and a page only accessible by authenticated users.
Setup
NB: All the code written in this article can be found here => Repo.
Clone that repo and you should have all you need to follow along with this article. After cloning the repo, create a new file .env in the root of the project folder.
Remember those credentials Google gave us when we created our project? We’ll need them now. Update the .env file to look exactly like this:
When you’re done, run npm i and after all the packages are done installing, run npm start . Look ma, no Webpack!
You should see this very underwhelming page open up in a new tab:
If you tried clicking on the “VIP Section” link, you’ll notice that an alert pops up telling you that you can only access this page when logged in. We’ll soon get to how that works but we’ll start with the basics first.
How was it built?
If you haven’t cloned the project repo, please do that now so that you can follow along with the code. I’ll focus only on the parts of the app that uses Firebase so that this doesn’t become yet another React tutorial. God knows we’ve had enough of those.
Open up src/utilities/firebase.js and let’s go through what that file is doing.
At the top, we’re importing the required packages to get Firebase to work properly. Again, dotenv is just there to help us read our .env file so don’t focus on that part.
Notice that we’re creating a fireBaseConfig object we need for Firebase to work properly. At the end of this file, we’re just initializing Firebase with our config object and exporting it in one go. Pretty simple stuff so far.
We now have Firebase configured and ready to go. It’s literally as simple as that. No fluff.
Signing up new users
Let’s go through the relevant part of src/components/Signup.jsx and how it works.
So this is the relevant part of the Signup component worth talking about. Going through this code, you’ll notice that we only use fBase (this is the Firebase instance we initialized in firebase.js ) once in the onFormSubmitfunction.
What is going on there anyway? So because we’re using Firebase for authentication, we get a bunch of methods at our disposal (full list here).
NB:One aspect of Firebase that I really like is the very descriptive names of all the methods. You want to strive for that in any project you work on.
There are various methods available to us for creating new users but for the sake of this article, we’ll go with the aptly named createUserWithEmailAndPassword() which does exactly what it says on the box.
So this method takes in two arguments: the new user’s email and password. It then creates the new user for us and stores that user in the free database given to us by Firebase.
Since calling this method is going to result in a Promise, we have to await it and when it completes successfully, we’re going to redirect the user to the protected page.
Try it out yourself. Start up the server by running npm start, visit the Signup page, create a new dummy user, go back to your Firebase console, and refresh the page. You should see a new user there like so:
It’s seriously that easy to create a new user with Firebase. I’m not going to include error handling here because this article will get quite long if I do but just know that Firebase catches errors like weak passwords and invalid emails for you even if you don’t manually set it up.
Try it for yourself and see. Go back to the Signup page, open your browser console, fill in the signup form and use a weak password (try “weak”) and click on submit. You’ll notice that the request will fail and you’ll see an error in your console telling you that your password is weak.
NB: You still want to set up password validation though because Firebase will allow nonsense passwords like “password”.
Bonus points if you can set up error handling with descriptive messages for the user, and a loader animation for when the request is pending.
Login
You saw how easy it was to create a new user using Firebase. Well, signing in that new user is just as simple. Let’s open src/components/Login.jsx and see how it’s done.
The relevant parts of this component are almost identical to the Signup component. There is only one difference.
Where we used fBase.auth().createUserWithEmailAndPassword to sign the user up, we are using fBase.auth().signInWithEmailAndPassword to log the user in. Seriously that’s the only difference.
Again, validation is already handled for us in the background. Try signing in the user we just created but use a wrong password and check your console. You should see a console error telling you that the password is invalid.
You can set up error handling and display this error to the user in less than 5 minutes. All the problems of safely storing passwords, issuing tokens, deciding on how to store the tokens, etc. have all been taken care of for us.
Checking if a user is logged in
We’ve seen how easy it is to create a new user, and how to sign users in. How do we check if a user is currently signed in or not? You might have guessed it by now: Call an fBase.auth() method. Let’s open src/Root.jsx and check how it’s done.
So this is the root component through which all other components get rendered. When this component mounts, we’re going to call yet another fBase.auth() method to help us check if a user is currently signed in.
If a user is currently signed in, auth will contain the details of that user such as the displayName, email, method of authentication, etc. If not, auth will be null .
It’s as simple as that. You don’t have to manually check sessionStorage, localStorage, or even fiddle around with Cookies (yuck!) to assert that a user is currently signed in.
Now how did we get “VIP Section” to only render when a user is logged in? Well since we can now check if a user is logged in and retrieve the details of that user, I decided to use a render method to conditionally render the protected component. Check here for more details.
The basic gist is that we check if this.state.user !== null and if it is, then we know that a user is currently signed in and we can allow the user to access the page. Here’s the code for that:
... omitted for brevity ...
function PrivateRoute({ component: Component, user, ...rest }) {
  if (!user) {
    window.alert('You must be signed in to access that page');
    return <Redirect to="/" />;
  }
Now there are other (and I’m sure, much better) ways to do this but you should get the gist by now. Call fBase.auth().onAuthStateChanged and if it returns anything other than null, then a user is currently signed in. Easy peasy.
Logout
You should know by now what I’m about to show you haha. To log out a user, all you have to do is call fBase.auth().signOut() wherever you want and the currently logged in user is automatically signed out.
Conclusions
So I wanted to clarify something before ending this article (btw if you followed it through to the end, you’re awesome and I love you). You DON’Thave to use Firebase to get a secure authentication system.
You can create a reasonably secure auth system on your own if you follow the current (they change all the time) best practices regarding authentication.
The reason I encourage people to use Firebase, however, is that it has been tested rigorously over the years and there is a far less chance of your users’ data getting breached than if you went solo. You really don’t want those lawsuits.
This article BARELY even scratched the surface of what Firebase can do. I mean BARELY. If you want to really (and I mean really) take advantage of the full capabilities of Firebase, then you should check out Jeff Delaney’s courses on Firebase.
DISCLAIMER: I don’t know Jeff personally and I’m not getting any commissions by recommending his courses. I only recommend him because he has a way of explaining things that makes everything a lot simpler. Go check him out. Seriously.
If you have any questions, have a better approach to all these, or found bugs in my ugly code, or just want to say hi, please let me know by commenting.
This is a follow up write up from the recent workshop at Andela on building a blockchain decentralised application. An assumption of this blog is that you already have an understanding of what blockchain is and what Ethereum is. But for those who you can view my presentation here and the follow here. They are quite simple to follow .
So what do we want to build. We want to build a voting application. A very simple one at that. Ethereum allows us to build centralised application and solidity is the language we are using to use along side javascript application as the front end. To setup our journey we will need the following applications installed as dependencies.
1. Node Package Manager (NPM):
2. Truffle
3. Ganache
4. Metamask
Node Package Manager
This allows us to manage and use packages from node.js. You can confirm on your system if you have it by typing on your command line $ npm -v
Truffle
This npm package allows us to build decentralized applications on the Ethereum blockchain. It allows us to test our smart contracts on our local blockchain copy and deploy the contracts on to the main blockchain network. You can install the version of truffle to use with the project by using the command below $ npm install -g truffle@4.1.15
Ganache
This application allows you to have 10 different fake accounts and fake ether. You can download it from here https://truffleframework.com/ganache
Metamask
It is an extension in chrome that we can use to interact with the local blockchain we start up or with the main ethereum blockchain. We will be using it in course of this application so you will want to search google for metamask extension and then install in on your chrome browser
We will proceed to develop our application both with solidity and javascript. However we will also write tests to make sure we are going in the right direction. One more thing depending on your editor, you may want to search out the plug-in to use for solidity syntax highlighting. This will help in writing the solidity code and show keywords etc.
For this tutorial, i will be using vscode as the IDE and solidity plugin by Juan Blanco
Step One:
First, open up the ganache application and you should see something like this
What you see above is 10 different accounts generated for you by ganache, and though in my own copy some accounts have less than 100 eth, yours should have 100 eth in all of the accounts. On the right most side of each account is a symbol like a key. This icon when clicked will show you your private key for the current account and can be used to import the account to different networks. This will be shown later.
Now lets start. Choose a location on your system and lets create a folder like what we have below
$ mkdir election
$ cd election
Now we are inside our folder we want to get up and running fast with a truffle project already existing. So within the election folder run the command below
$ truffle unbox pet-shop
If you are having challenges downloading the truffle’s pet-shop app you can always download it from the repository by using the following command within the election folder
In this tutorial, i used VSCode and you can open the current folder with this command
code .
After the above you should have the following in your view in whatever IDE you use.
Lets go through what we have here:
contracts directory: this is where we will be keeping all of our smart contracts. Already you can see that we have a migration contract inside that handles our migrations to the blockchain.
migrations directory: this is where all of the migration files live. If you have developed in other frameworks that have ORM you will notice that this is something familiar. Whenever we deploy smart contracts to the blockchain, we are updating the blockchain’s state, and therefore need a migration.
node_modules directory: this is the home of all of our Node dependencies.
src directory: this is where we’ll develop our client-side application.
test directory: this is where we’ll write our tests for our smart contracts.
truffle-config.js file: this is the main configuration file for our Truffle project
truffle-box.json file: this file contains some commands that can be used in the project
Before we go further, you may want to create a repository for your project and initialize the current folder and map the current folder to that repository.
Then we start writing our smart contracts. For unix like users you can use the command below,
$ touch contracts/Election.sol
and for windows users you can do this.
The next thing to do paste this into your Election.sol file
The first line declares the version of solidity you wish you write your code in. This is done first in all solidity smart contracts. The declaration of the smart contract is started with the keyword contract just like in OOP, you start a class with the keyword class. Next we declared a candidate string and make it public. In other backend languages like c# or java, the public keyword will come before string. Also in solidity declaring the variable candidatepublic will generate a free getter function from solidity.
Next is the contructor function, this function gets called whenever the smart contract is deployed to the blockchain. If you are new to OOP programming, a constructor function is usually where you initialize variables and objects within the function.
Next we want to deploy our contract to the blockchain, but first we need to create a migration file for it. In the migration, folder you will notice one file there that starts with the number 1. We will number our migration files, so as to define the order the migration will be deployed. Create a new migration file with the name ‘ 2_deploy_contracts.js’ via the IDE or from the command line like this $ touch migration/2_deploy_contracts.js
Copy the code below into the file
var Election = artifacts.require("./Election.sol");

module.exports = function(deployer) {
  deployer.deploy(Election);
};
Next we run from the terminal or console the following commands
$ truffle migrate
After the migration is completed, we want to interact with our deployed smart contract. At the terminal type
$ truffle console
You should see a console with the prompt like this $ truffle<development>:
Election is the name of the contract we created earlier and we retrieved a deployed instance of the contract with the deployed()function, and assigned it to an app variable inside the promise’s callback function.
After entering the above code you should see $ undefinedthis should not worry you as it just means the process is done. However we now have a variable appthat can be used to call the candidate like this.
$ app.candidate()
Now we are here you have deployed your smart contract and you can retrieve from it.
Step Two:
Now we go to the next step of our application. We need to store more properties of our candidate like id, name, number of votes and we need a way to store more than one candidate. So we will use the struct type and mappingtype to achieve this respectively.
Struct is a type in solidity that allows you to create your structure in solidity and mapping is like an associative array or hash with key-value pairing allowed. You can view more types in the documentation of the version of solidity we are using here. Our election code will be modified to look like this
contract Election {
    // Model a Candidate
    struct Candidate {
        uint id;
        string name;
        uint voteCount;
    }

    // Read/write Candidates
    mapping(uint => Candidate) public candidates;

    // Store Candidates Count
    uint public candidatesCount;

    // ...
}
Our candidate model has an un-signed integer type for id, string type for name and un-signed integer type for voteCount. We will need to instantiate this candidate in our constructor and assign them values.
We also see in the code above, we declared a mapping type to be used to store the list of candidates and the key to the mapping is an un-signed integer.
We also keep track of all candidates in the mapping as the mapping structure in solidity doesn’t allow for declaring a size of the mapping. Instead the mapping structure returns values based on the key passed to it. For example if we have a mapping with just 5 candidates, and we try to retrieve from the mapping a candidate with the unsigned integer 50, we will get an empty candidate structure. If a key is not found is returns an empty result. Read more on mapping here.
Next lets create a function to add our candidate to the mapping structure with the code below.
We’ve declared the function addCandidate that takes one argument of string type that represents the candidate’s name. Inside the function, we increment the candidate counter cache to denote that a new candidate has been added. Then we update the mapping with a new Candidate struct, using the current candidate count as the key. This Candidate struct is initialized with the candidate id from the current candidate count, the name from the function argument, and the initial vote count to 0. Note that this function’s visibility is private because we only want to call it inside the contract.
If you are coming from the c# or java background you will notice that the keywords public and private are used to declare the function or property but are placed after the argument in functions and after type in variable declaration.
Now we can add candidates to our election app by calling the above function in the constructor like this
When we migrate our application again to the blockchain, two candidates will be automatically created. At this point our code should look like what we have below:
pragma solidity ^0.4.24;

contract Election {
    // Model a Candidate
    struct Candidate {
        uint id;
        string name;
        uint voteCount;
    }

    // Read/write candidates
    mapping(uint => Candidate) public candidates;

    // Store Candidates Count
    uint public candidatesCount;

    constructor () public {
        addCandidate("Candidate 1");
        addCandidate("Candidate 2");
    }

    function addCandidate (string _name) private {
        candidatesCount ++;
        candidates[candidatesCount] = Candidate(candidatesCount, _name, 0);
    }

}
Now we can run our migration again using the reset command resetlike this
$ truffle migrate --reset
And now we have a working smart contract. Next to confirm what we have done so far, enter the truffle console like we did earlier and enter this same command as earlier
This time to retrive a candidate we have to enter the below code
app.candidates(1)
Here we are entering the candidates index value . we can replace 1 with 2 and see what we get back.
Writing Tests
Next create a test file name ‘election.js’ under tests folder. Truffle framework comes with mocha testing framework and chai library to run our tests. Lets paste the code below in our file.
var Election = artifacts.require("./Election.sol");

contract("Election", function(accounts) {
  var electionInstance;

  it("initializes with two candidates", function() {
    return Election.deployed().then(function(instance) {
      return instance.candidatesCount();
    }).then(function(count) {
      assert.equal(count, 2);
    });
  });

  it("it initializes the candidates with the correct values", function() {
    return Election.deployed().then(function(instance) {
      electionInstance = instance;
      return electionInstance.candidates(1);
    }).then(function(candidate) {
      assert.equal(candidate[0], 1, "contains the correct id");
      assert.equal(candidate[1], "Candidate 1", "contains the correct name");
      assert.equal(candidate[2], 0, "contains the correct votes count");
      return electionInstance.candidates(2);
    }).then(function(candidate) {
      assert.equal(candidate[0], 2, "contains the correct id");
      assert.equal(candidate[1], "Candidate 2", "contains the correct name");
      assert.equal(candidate[2], 0, "contains the correct votes count");
    });
  });
});
Lets go through this file. We have imported our Election contract into this test file and created a test contract instance while injecting our accounts to be used for the testing. We have actually written two main tests and these tests tests for
1. The number of candidates initalized.
2. The values of the candidate object initialized with proper values.
To see if our test is fine, we can execute the following command.
$ truffle test
Phew!!! what a long way we have come but if you happen to get stuck along the way you can get the repository from online.
Our Client Application
We download the truffle pet-shop template because it allows us to quickly setup a lot of stuff. So its like a bootstrap template we have gotten to quickly setup and go. The template folder comes with html , css and js files. We do not wish to dwell too much on the client application building aspects of this, so we will replace that javascript file and the index.html file with this codes below
First we start with app.js file
App = {
  web3Provider: null,
  contracts: {},
  account: '0x0',

  init: function() {
    return App.initWeb3();
  },

  initWeb3: function() {
    if (typeof web3 !== 'undefined') {
      // If a web3 instance is already provided by Meta Mask.
      App.web3Provider = web3.currentProvider;
      web3 = new Web3(web3.currentProvider);
    } else {
      // Specify default instance if no web3 instance provided
      App.web3Provider = new Web3.providers.HttpProvider('http://localhost:7545');
      web3 = new Web3(App.web3Provider);
    }
    return App.initContract();
  },

  initContract: function() {
    $.getJSON("Election.json", function(election) {
      // Instantiate a new truffle contract from the artifact
      App.contracts.Election = TruffleContract(election);
      // Connect provider to interact with contract
      App.contracts.Election.setProvider(App.web3Provider);

      return App.render();
    });
  },

  render: function() {
    var electionInstance;
    var loader = $("#loader");
    var content = $("#content");

    loader.show();
    content.hide();

    // Load account data
    web3.eth.getCoinbase(function(err, account) {
      if (err === null) {
        App.account = account;
        $("#accountAddress").html("Your Account: " + account);
      }
    });

    // Load contract data
    App.contracts.Election.deployed().then(function(instance) {
      electionInstance = instance;
      return electionInstance.candidatesCount();
    }).then(function(candidatesCount) {
      var candidatesResults = $("#candidatesResults");
      candidatesResults.empty();

      for (var i = 1; i <= candidatesCount; i++) {
        electionInstance.candidates(i).then(function(candidate) {
          var id = candidate[0];
          var name = candidate[1];
          var voteCount = candidate[2];

          // Render candidate Result
          var candidateTemplate = "<tr><th>" + id + "</th><td>" + name + "</td><td>" + voteCount + "</td></tr>"
          candidatesResults.append(candidateTemplate);
        });
      }

      loader.hide();
      content.show();
    }).catch(function(error) {
      console.warn(error);
    });
  }
};

$(function() {
  $(window).load(function() {
    App.init();
  });
});
Let’s take note of a few things that the App.js code does:
Set up web3: web3.js is a javascript library that allows our client-side application to talk to the blockchain. We configure web3 inside the “initWeb3” function.
Initialize contracts: We fetch the deployed instance of the smart contract inside this function and assign some values that will allow us to interact with it.
Render function: The render function lays out all the content on the page with data from the smart contract. At this point we are only listing the candidates that were created in the smart contract and rendering it in a table. We also fetch the current account that is connected to the blockchain inside this function and display it on the page.
For the html, its a simple html webpage. It nothing complicated.
Now let’s view the client-side application in the browser. First, make sure that you’ve migrated your contracts like this:
$ truffle migrate --reset
Next, start your development server from the command line like this:
$ npm run dev
This should automatically open a new browser window with your client-side application.
Make sure your local blockchain is running in ganache. If yours is not running make sure that the port number in ganache is the same with the port number in the truffle-config.js file.
Also make sure you are logged into metamask and import one or two accounts from the ganache set of accounts into metamask.
Importing account into metamask:
Step 1: In you running ganache app pick one of the account you wish to import and click on the key at the right most side.
Step 2: Open your metamask in your chrome browser. Login if you have not.
Step 3: Select a localhost Network out of the different networks you see available there (localhost:8545)
Step 4: Click on icon on the top right corner and select import account.
Step 5: Paste the private key there and your account has been successfully imported.
Once that is done when you refresh the application you should see this
Election Page Loaded
Step 3: Voting
Now we need to allow our application accept voting. Let’s work on this functionality. Under the mapping we declared for candidates, we will declare another mapping for votes.
// Store accounts that have voted
mapping(address => bool) public voters;
We will also add a function for voting to the Election contract
function vote (uint _candidateId) public {
        // require that they haven't voted before
        require(!voters[msg.sender]);

        // require a valid candidate
        require(_candidateId > 0 && _candidateId <= candidatesCount);

        // record that voter has voted
        voters[msg.sender] = true;

        // update candidate vote Count
        candidates[_candidateId].voteCount ++;
    }
The core functionality of this function is to increase the candidate’s vote count by reading the Candidate struct out of the “candidates” mapping and increasing the “voteCount” by 1 with the increment operator (++). Let’s look at a few other things that it does:
It accepts one argument. This is an unsigned integer with the candidate’s id.
Its visibility is public because we want an external account to call it.
It adds the account that voted to the voters mapping that we just created. This will allow us to keep track that the voter has voted in the election. We access the account that’s calling this function with the global variable “msg.sender” provided by Solidity.
It implements require statements that will stop execution if the conditions are not met. First require that the voter hasn’t voted before. We do this by reading the account address with “msg.sender” from the mapping. If it’s there, the account has already voted. Next, it requires that the candidate id is valid. The candidate id must be greater than zero and less than or equal to the total candidate count.
The complete Election.sol should look like this:
pragma solidity ^0.4.25;

contract Election {
    // Model a Candidate
    struct Candidate {
        uint id;
        string name;
        uint voteCount;
    }

    // Store accounts that have voted
    mapping(address => bool) public voters;
    // Read/write candidates
    mapping(uint => Candidate) public candidates;
    // Store Candidates Count
    uint public candidatesCount;

    function Election () public {
        addCandidate("Candidate 1");
        addCandidate("Candidate 2");
    }

    function addCandidate (string _name) private {
        candidatesCount ++;
        candidates[candidatesCount] = Candidate(candidatesCount, _name, 0);
    }

    function vote (uint _candidateId) public {
        // require that they haven't voted before
        require(!voters[msg.sender]);

        // require a valid candidate
        require(_candidateId > 0 && _candidateId <= candidatesCount);

        // record that voter has voted
        voters[msg.sender] = true;

        // update candidate vote Count
        candidates[_candidateId].voteCount ++;
    }
}
Testing the Voting Functionality
Now let’s add a test to our “election.js” test file:
it("allows a voter to cast a vote", function() {
    return Election.deployed().then(function(instance) {
      electionInstance = instance;
      candidateId = 1;
      return electionInstance.vote(candidateId, { from: accounts[0] });
    }).then(function(receipt) {
      return electionInstance.voters(accounts[0]);
    }).then(function(voted) {
      assert(voted, "the voter was marked as voted");
      return electionInstance.candidates(candidateId);
    }).then(function(candidate) {
      var voteCount = candidate[2];
      assert.equal(voteCount, 1, "increments the candidate's vote count");
    })
  });
We want to test two things here:
Test that the function increments the vote count for the candidate.
Test that the voter is added to the mapping whenever they vote.
Next we can write a few test for our function’s requirements. Let’s write a test to ensure that our vote function throws an exception for double voting:
it("throws an exception for invalid candidates", function() {
    return Election.deployed().then(function(instance) {
      electionInstance = instance;
      return electionInstance.vote(99, { from: accounts[1] })
    }).then(assert.fail).catch(function(error) {
      assert(error.message.indexOf('revert') >= 0, "error message must contain revert");
      return electionInstance.candidates(1);
    }).then(function(candidate1) {
      var voteCount = candidate1[2];
      assert.equal(voteCount, 1, "candidate 1 did not receive any votes");
      return electionInstance.candidates(2);
    }).then(function(candidate2) {
      var voteCount = candidate2[2];
      assert.equal(voteCount, 0, "candidate 2 did not receive any votes");
    });
  });
We can assert that the transaction failed and that an error message is returned. We can dig into this error message to ensure that the error message contains the “revert” substring. Then we can ensure that our contract’s state was unaltered by ensuring that the candidates did not receive any votes.
Now let’s write a test to ensure that we prevent double voting:
it("throws an exception for double voting", function() {
    return Election.deployed().then(function(instance) {
      electionInstance = instance;
      candidateId = 2;
      electionInstance.vote(candidateId, { from: accounts[1] });
      return electionInstance.candidates(candidateId);
    }).then(function(candidate) {
      var voteCount = candidate[2];
      assert.equal(voteCount, 1, "accepts first vote");
      // Try to vote again
      return electionInstance.vote(candidateId, { from: accounts[1] });
    }).then(assert.fail).catch(function(error) {
      assert(error.message.indexOf('revert') >= 0, "error message must contain revert");
      return electionInstance.candidates(1);
    }).then(function(candidate1) {
      var voteCount = candidate1[2];
      assert.equal(voteCount, 1, "candidate 1 did not receive any votes");
      return electionInstance.candidates(2);
    }).then(function(candidate2) {
      var voteCount = candidate2[2];
      assert.equal(voteCount, 1, "candidate 2 did not receive any votes");
    });
  });
First, we’ll set up a test scenario with a fresh account that hasn’t voted yet. Then we’ll cast a vote on their behalf. Then we’ll try to vote again. We’ll assert that an error has occurred here. We can inspect the error message, and ensure that no candidates received votes, just like the previous test.
Now let’s run our tests:
$ truffle test
Yay, they pass!
The Actual Voting
Let’s add a form that allows accounts to vote below the table in our “index.html” file:
We create the form with an empty select element. We will populate the select options with the candidates provided by our smart contract in our “app.js” file.
The form has an “onSubmit” handler that will call the “castVote” function. We will define this in our “app.js” file.
Next we need to update our app.js file to be able to handle both of the processes above. We want a dropdown so that candidates can be listed and selected. Remember you may wish to use an radio button for this also. Then we will hide the form when the account has voted. Remember we will the voter to vote only once.
render: function() {
  var electionInstance;
  var loader = $("#loader");
  var content = $("#content");
  // Load contract data
  App.contracts.Election.deployed().then(function(instance) {
    electionInstance = instance;
    return electionInstance.candidatesCount();
  }).then(function(candidatesCount) {
    var candidatesResults = $("#candidatesResults");
    candidatesResults.empty();
    var candidatesSelect = $('#candidatesSelect');
    candidatesSelect.empty();
    for (var i = 1; i <= candidatesCount; i++) {
      electionInstance.candidates(i).then(function(candidate) {
        var id = candidate[0];
        var name = candidate[1];
        var voteCount = candidate[2];
        // Render candidate Result
        var candidateTemplate = "<tr><th>" + id + "</th><td>" + name + "</td><td>" + voteCount + "</td></tr>"
        candidatesResults.append(candidateTemplate);
        // Render candidate ballot option
        var candidateOption = "<option value='" + id + "' >" + name + "</ option>"
        candidatesSelect.append(candidateOption);
      });
    }
    return electionInstance.voters(App.account);
  }).then(function(hasVoted) {
    // Do not allow a user to vote
    if(hasVoted) {
      $('form').hide();
    }
    loader.hide();
    content.show();
  }).catch(function(error) {
    console.warn(error);
  });
}
Next, we need to write a function that is called when the submit button is clicked, ie we cast a vote. See below:
castVote: function() {
    var candidateId = $('#candidatesSelect').val();
    App.contracts.Election.deployed().then(function(instance) {
      return instance.vote(candidateId, { from: App.account });
    }).then(function(result) {
      // Wait for votes to update
      $("#content").hide();
      $("#loader").show();
    }).catch(function(err) {
      console.error(err);
    });
  }
First, we query the contract for the candidateId in the form. When we call the vote function from our smart contract, we pass in this id, and we provide the current account with the function’s “from” metadata. This will be an asynchronous call. When it is finished, we’ll show the loader and hide the page content. Whenever the vote is recorded, we’ll do the opposite, showing the content to the user again.
Now your front-end application should look like this:
Go ahead and try the voting function. Once you do, you should see a Metamask confirmation pop up like this:
Depending on your system it may open a new tab instead of a new pop-up window.
Once you click submit, you’ve successfully casted a vote! You’ll still see a loading screen. For now, you’ll have to refresh the page to see the votes recorded. We’ll implement the functionality update the loader automatically in the next section.
Step 4: Watch Events
The thing we want to add to our application is disable the submit button whenever a vote is cast. We do this by triggering an event. This will allow us to update our client-side application when an account has voted. We will start by declaring an event in our contract like this:
Now that we’ve updated our contract, we must run our migrations:
$ truffle migrate --reset
We can also update our tests to check for this voting event like this:
it("allows a voter to cast a vote", function() {
  return Election.deployed().then(function(instance) {
    electionInstance = instance;
    candidateId = 1;
    return electionInstance.vote(candidateId, { from: accounts[0] });
  }).then(function(receipt) {
    assert.equal(receipt.logs.length, 1, "an event was triggered");
    assert.equal(receipt.logs[0].event, "votedEvent", "the event type is correct");
    assert.equal(receipt.logs[0].args._candidateId.toNumber(), candidateId, "the candidate id is correct");
    return electionInstance.voters(accounts[0]);
  }).then(function(voted) {
    assert(voted, "the voter was marked as voted");
    return electionInstance.candidates(candidateId);
  }).then(function(candidate) {
    var voteCount = candidate[2];
    assert.equal(voteCount, 1, "increments the candidate's vote count");
  })
});
This test inspects the transaction receipt returned by the “vote” function to ensure that it has logs. These logs contain the event that was triggered. We check that the event is the correct type, and that it has the correct candidate id.
New we have to update the client -side application. We want to make sure that the application listens for the voted event and fires a page refresh any time that it is triggered. We can do that with a “listenForEvents” function like this:
listenForEvents: function() {
  App.contracts.Election.deployed().then(function(instance) {
    instance.votedEvent({}, {
      fromBlock: 0,
      toBlock: 'latest'
    }).watch(function(error, event) {
      console.log("event triggered", event)
      // Reload when a new vote is recorded
      App.render();
    });
  });
}
This function does a few things. First, we subscribe to the voted event by calling the “votedEvent” function. We pass in some metadata that tells us to listen to all events on the blockchain. Then we “watch” this event. Inside here, we log to the console anytime a “votedEvent” is triggered. We also re-render all the content on the page. This will get rid of the loader after the vote has been recorded, and show the updated vote count on the table.
Finally, we can call this function whenever we initialize the contract:
initContract: function() {
  $.getJSON("Election.json", function(election) {
    // Instantiate a new truffle contract from the artifact
    App.contracts.Election = TruffleContract(election);
    // Connect provider to interact with contract
    App.contracts.Election.setProvider(App.web3Provider);
App.listenForEvents();
    return App.render();
  });
}
Now, you can vote on your client-side application, and watch the votes recorded in real time! Be patient, it might take a few seconds for the event to trigger. If you don’t see an event, try restarting Chrome. There is a known issue with Metamask surrounding events. Restarting Chrome always fixes it for me.
Congratulations! And there you have it. You have successfully built a full stack decentralized application on the Ethereum blockchain! Whew!
Earlier this year Andela announced raising a $100M Series D to continue investing in great engineers and building the infrastructure to power distributed work. As you may have recently heard, the round also included investment from Serena Ventures, a fund founded by 23-time tennis Grand Slam champion (and G.O.A.T.) Serena Williams.
Serena has quietly been investing in technology companies since 2014 and decided this was the year to make it #Instagramofficial. The firm is focused on investing in diverse companies and now provides mentorship and support to over 30 portfolio companies.
“It is so important for Serena Ventures to collaborate with companies that align with our mission of creating opportunities for everyone.” said Serena Williams, “Andela is an incredible organization that makes it possible for talent across Africa to pursue careers in tech and become leaders in their field. Furthermore, Andela empowers female engineers and I am proud to partner with a company committed to opening doors for women in a male-dominated industry.”
“As we build towards the distributed future of work, we are proud to have investors who also believe that while the digital revolution may have started in Silicon Valley, it’s future will be written in cities across Africa” says Jeremy Johnson, co-founder and CEO of Andela. “In Serena Ventures, we’ve found a values-aligned partner that also cares deeply about diversity, empowerment and opportunity, and we’re proud to be on this journey together.”
Alongside Andela, Serena Ventures portfolio includes Andela partnerGobble, as well as other industry disruptors such as startup CoinBase, African startup Wave and women’s co-working spaceThe Wing, among others. Please join us in welcoming Serena Williams to the #TIA family!
Let’s, first of all, understand what this word even means before we dive into fighting it as a vice. I googled it and this meaning came up — “the action of delaying or postponing something”. Google’s description is entirely accurate. In more literal terms, it is that voice that pops up inside your head, whenever there is something super important for you to do and boldly tells you — “Not now, later is just fine”. Whenever you want to do something that is most likely very rewarding but “something”, tells you that you can do it later, you’re procrastinating.
So why do we procrastinate? Let’s take a look at some of the reasons why we procrastinate
1. What you’re doing isn’t at all interesting.
This is probably the most common reason as to why we tend to procrastinate about some of the tasks that are usually most rewarding. It is quite absurd when you internalise that. The tasks we procrastinate about the most are, more often than not, the most rewarding. They are usually tasks that solve some of the biggest problems but we are less interested nonetheless. Ever stop and wonder why this is like that?
Well, this happens because when you try to achieve very huge milestones in one go, you tend to forget that what you are looking to accomplish is a huge task that requires you to have a VERY high level of motivation than we ordinarily have. Because our brains, according to BJ Fogg, a behavioural scientist at Stanford University, are more motivated by instant rewards for our work than delayed rewards. We, subconsciously, consider instant rewards more gratifying than delayed ones.
Think about this from the time you started your coding career. Remember how you started out? All you thought was that you would start coding and in a couple of weeks, you’d be able to deploy a kickass application that would change the world and have millions of users. Little did you know that this could take you months or more to accomplish. What happened when you started coding? You started to, intrinsically, create small milestones like “If I can be able to build a beautiful user interface in HTML and CSS, I’ll have made significant progress”. And boom, now you’re a kickass world-class software developer.
Well, I’ve already hinted on how you can motivate yourself if this is why you’re procrastinating but in more detail, break down the task into more minute, achievable milestones. If you don’t know how to, talk to mentors, friends and any developers who have, possibly, executed a similar task to help you prioritize your time.
Now that you’re finished with that and you clearly know what smaller tasks can effectively build up to the bigger goal, attach a reward to each of them. What kind of reward? Make it something that’s easily within reach (for you), and after completing each small task, reward yourself.
Why should you reward yourself? Well, if you noticed, I kept hinting on instant gratification and this reward is exactly that. It is that smaller win that your brain, subconsciously works toward getting. This introduces the concept of “Trigger -> Task -> Celebration”.
The trigger, in this case, is the task that you have to do. Why is that so? The moment you create small INSTANT rewards for each task, your brain instinctively starts to do whatever it takes to achieve that reward and all there is to do is that task, which triggers an action. The action is the actual work you put in to accomplish this task and then finally the celebration. The celebration is that reward that you promised yourself after this task is finished.
That small celebration should be something really small like a favourite snack, a cup of coffee, video game or even something as trivial as chewing gum.
2. We are scared of failing.
Another reason for procrastination is that we are constantly scared of failing, so much that we don’t want to start doing anything that has even a little shade of failure. The instant we see a sprinkle of failure, our energy is immediately beaten down and we are much less motivated to do it, which pushes to “not now, later is good enough”.
As a software engineer, reminisce on the day when you wrote your first line of code. Look how far you’ve come, how many falls you’ve had to endure and come back up from. Do you think you’d come this far without a few of those failures? Certainly not. The secret to failing successfully is failing fast and getting back up even faster.
I’ll admit, failure is scary because we know that it, sometimes, comes with consequences that we feel could have been avoided by simply “not failing”. What we don’t remember, though, is the fact that the only justification for failure is a lesson learnt and another trial so you need to allow yourself to fail and think about it as a learning point rather than a wasted attempt.
A simple secret, “fail fast” is an unofficial rule that startups in Silicon Valley live by.
3. We don’t even know where to begin.
Sometimes we, genuinely, are oblivious of what the exact tasks we’re taking on require to be executed to completion and as such, we have a reason not to deliver on this task.
As software engineers, we’re constantly facing new challenges, new problems that need new solutions or sometimes some require us to reuse previous “genius” engineers’ solutions but we don’t even know where to find these.
If this state of oblivion is the cause for your procrastination, then look for mentors, fellow engineers or more experienced developers to give you better insight on how to approach this task and break it down faster, easier and more efficiently get a starting point so that you can do away with the procrastination and get down to work.
We’ve explored this vice and I trust we know why we procrastinate and how we can keep ourselves motivated, not scared of
So the next big question is, why should we even fight it? Well, the simple answer is, your productivity is directly tied to how fast you deliver tasks. If you take a week to deliver a task that could have taken somebody of your skill level, two days, you are effectively being very unproductive and this has obvious negative consequences to both the company, in terms of revenue, as well as your job(I guess we all know how bad things could go in this regard ).
One other reason you should consider not stalling that huge task is that, as a world-class software developer, all your work is directed toward solving problems and so the longer you take without solving these problems, the longer they exist and this considerably invalidates the reason you even took on this career(irrespective of what pushed you to join software development as a career, one thing remains true, you MUST solve a problem).
I hope we fight procrastination better as we reward ourselves, welcome failure better and seek all the clarity we need even in the most uncertain of situations.
Headspace is a pocket-sized personal meditation guide that helps users achieve healthier, happier, more well-rested lives with less stress, fewer distractions, better focus, and enhanced compassion through guided meditation and mindfulness practices. Committed to customer experience and engagement, they knew they’d need a way to support their growing user base from an engineering perspective.
More CX Tools to Meet a Growing User Base
With this growth, Headspace’s Customer Experience team anticipated a spike in support requests. They didn’t want to just hire more help agents, but instead needed to build out processes and tools to enable their current agents to complete more inbound tickets in the same time frame.
Clarissa Negrete came on as Product Manager to lead CX growth, but she lacked engineers to help hit her goals. “Our engineering team has always been lean. We needed to augment a very small team who was working on really ambitious goals.”
In need of a senior developer to begin contributing immediately, but lacking a recruitment team to refine their hiring process, Headspace turned to Andela and partnered with their first distributed developer, Samora Dake, based in Ghana. Samora excelled in his role, taking the lead on Headspace’s CMS development and even winning an internal hackathon.
Ready to Scale with a Talent Pipeline
Clarissa recalls, “For a while, it was just me and Samora working on a tool for the CX team and a website Help Center.” As her role expanded beyond CX to cover all Internal Tools, the company also hired a CTO who developed an engineering management structure ready for an expanded team of software engineers.
Up against budget and schedule constraints, along with a tough California job market, Headspace turned to Andela’s trusted and ready talent pipeline to scale their team.
With Andela’s streamlined hiring, training, and onboarding, Headspace brought on two junior Andelans to help with the CX tool, one for the website, and a fourth for CMS work. “They all report to Samora. He has 1:1s with all of them. Now instead of working project-by-project, we’re more a team of two internal Headspace engineers and the rest Andelans.”
A Cohesive, Distributed Team
Fluid integration and communication was a high priority for Clarissa. “Andela engineers are all extremely easy to work with and brighten my day. I’ve never worked with such pleasant, happy, eager to learn and please engineers, ever.” Unlike Headspace’s previous remote experiences that felt disconnected and transactional, Andela engineers are part of the team. “They attend our lunch meetings, our all-hands. They’re just like FTEs who are remote, and that’s not a feeling I’ve ever had working with other outsourced engineers.”
This team cohesion and positive attitude is crucial when developers are performing demanding, foundational work. “They may not be working on the flashy, sexiest things, but this infrastructure and foundational work that they are doing is so important for our company.”
Support for Learning on the Job
Andelans are also ramping up quickly on coding languages, many of them older or difficult to learn. “In a normal hiring process, when an engineer doesn’t know the language, we wouldn’t consider them. The Andela relationship is different.”
Because Andela provides ongoing support and training to all its developers, on-the-job learning, even of a brand new language, is an opportunity that benefits everyone. “Andela helps developers grow and learn with their partners. Providing that opportunity for them—everyone wins. It may serve them in their next role, and it helps us in the immediate future.”
Now, Headspace is moving into offering its services directly to companies and has doubled its number of corporate clients since 2018. Today, the company continues to grow with Andela developers working on its key platform, aiding Headspace’s expansion and its mission to bring mindfulness to individuals and workplaces across the world.
“Code is read much more often than it is written.” — Guido van Rossum
I think the same can be said for terminal commands except that we edit them more than we write new ones.
Whether it’s scrolling up the terminal or using the mouse to copy a command, it’s possible to use your keyboard to do all of these things. Additionally, not having to shift from the keyboard to the mouse will ease the strain on fingers.
For some of the commands, we’ll be using the Control key on Mac which is interchangeable with the Ctrl key on Windows.
These shortcuts are meant to run on Unix shells and so will work on bash, zsh and fish e.t.c.
Let’s get started!
Moving the cursor
Let’s say you wanted to check out the master branch using git. However because you’ve perhaps been so into Game of Thrones lately, you type it in as:
The cursor is already at the end of the line. You want to move it to the start of the line and change got to git? Hold the control button and press a.
ctrl-a
Do you want to move the cursor to the end of the line?
ctrl-e
A good way of remembering these two commands is that a is the start of the alphabet and e stands for end.
Cutting text
Have you ever typed something only to realize that you need to delete the whole line? Pressing backspace is inefficient especially when deleting long commands.
If the cursor is at the end of the line, use ctrl-u to cut all the text until the start of the line.
If you are at the start of the line, you can use ctrl-k to cut all the text until the end.
Since both ctrl-k and ctrl-u actually cut the text, it’s possible to paste this text back to the terminal using ctrl-y.
Sometimes you only need to delete a piece of text and not the entire line. For this, you can use ctrl-w to delete a word.
Searching commands
You have run a command before but you can’t remember it word for word. Not to worry, ctrl-r is here to help.
ctrl-r is like Google/DuckDuckGo for your terminal.
It opens up a “search bar” where you can type in anything and it will try and look for a previous command that’s closest to what you’ve typed.
After getting a match, you can just use ctrl-r to cycle through the results to find the one that you are looking for.
The last command
Typing in `!!` references the last command that you ran. At first, this might seem trivial because you could just press the up button on your keyboard to go to the previous command.
However, its power comes in when you want to append it to a command.
Let’s say you’ve run a command and find out that it requires sudo. You can do sudo !! and this will append the last command to sudo. The example below is not the best but I hope it helps in understanding when it’s best to use.
esc ,: holding the escape button and then pressing the comma key returns the last parameter of the last command that was run.
If the last command was git checkout master, esc ,will return master and !!will return git checkout master.
It is best used when you want to use a parameter in the last command without having to type it all over again.
Conclusion
It’s not possible to learn all of these shortcuts at once. A good way to do this is to come back and refer to them when you find that there’s something that you are doing that isn’t efficient.
I hope that this saves you some developer hours and shows you how easy it is to change got to git.
It is not uncommon to hear those seven words (or YOYO) during your onboarding session when you start at Andela. It’s not just a mantra that people casually throw around; it is a persistent reminder to all – that making it into the company isn’t the end of the journey, but the beginning. Applicants go through weeks of rigorous assessments before selection, and it can be tempting to take a break after everything. YOYO is how everyone stays grounded and maintains the need to level-up.
Software engineering is a profession for life-long learners. The same is true of most professions, but it is especially apparent in technology, because of the pace of innovation and updates of tools and systems. Programming languages are always in a state of flux; some get left behind as others gain more adoption.
For aspiring software engineers at Andela, we always advise that you use our home study curriculum to guide you as you continue to learn and get better. The curriculum introduces you to the core stacks and technologies we use at Andela, even as you prepare and practice on other platforms like Codecademy, Udemy, Edx, Udacity, etc. Cultivating a habit of owning your own learning helps you build the necessary muscles that will come in handy when your career as a software engineer takes off.
The Andela Home Study Curriculum Home Page
Every year, Stack Overflow releases an annual survey report of Software development which shows useful insights on the software industry, covering areas like languages & frameworks, technology, methodology, developer profiles and how they work. It is one source of truth that captures the state of the industry for the last calendar year. Every year’s report delivers new insights on what’s hot right now and what will be trendy soon. As you grow and continue to get better at your craft, survey reports like these will become useful for keeping track on what is going on in the industry.
Dedicating time out to learn on your journey to joining Andela as a Software Engineer isn’t only important in the achievement of your quest, but instead, in cultivating a life-long habit, and ultimately getting better at your craft. The best engineering teams in the world are always looking to hire and work with top talent. Wouldn’t you love to stand a real chance?


 .
.


 . (It is also the colloquial name for a rather serious eye infection – and it is at this point I just realized why my parents have been giving me funny looks after they learned I work with ‘Apollo.’) So “
 Server ready at


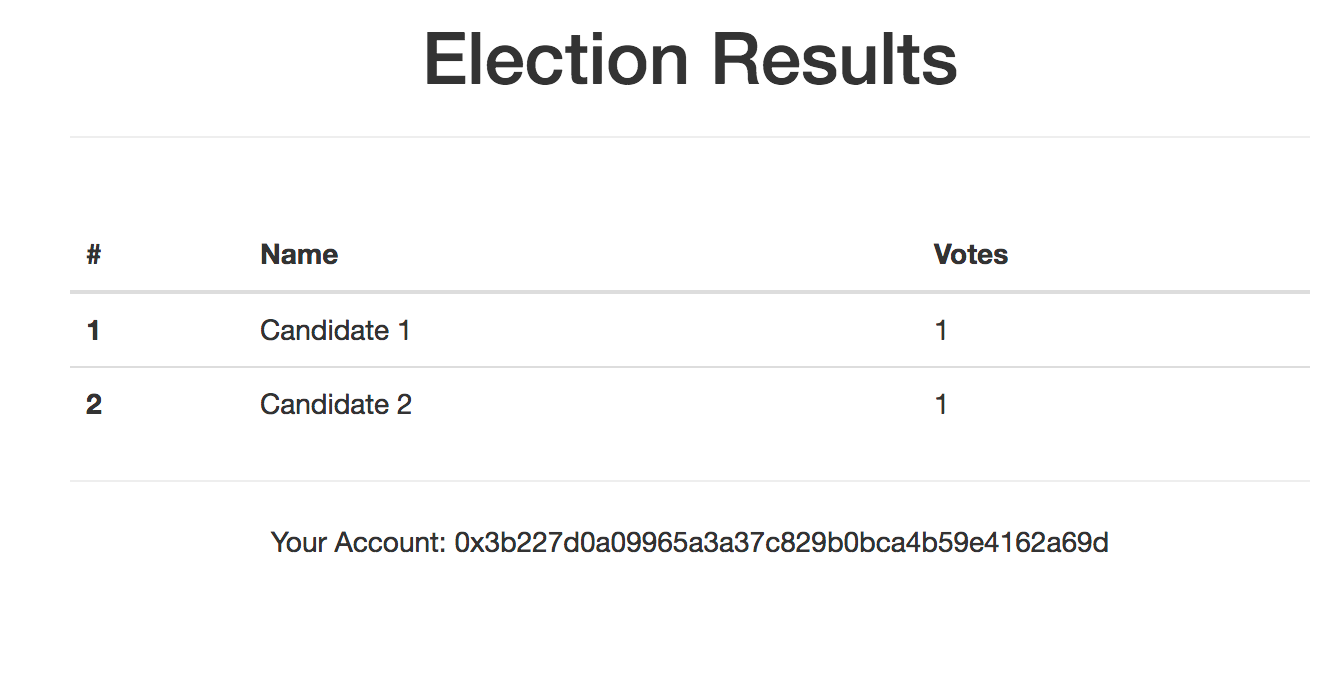

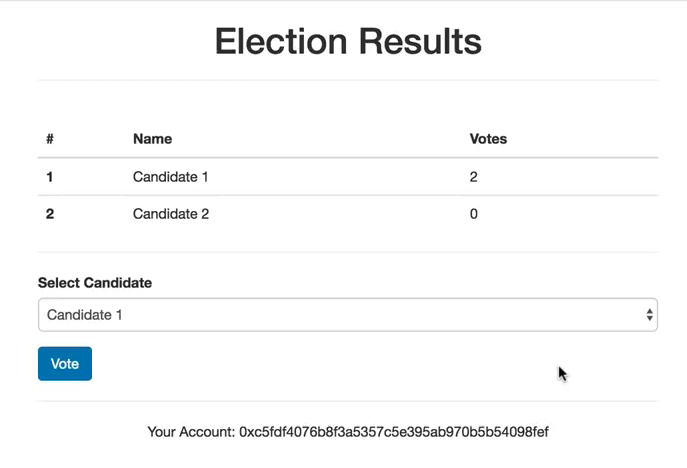

 ).
).


